I've been documenting my quest to make building and destroying a local lab using NXOSv 9000 as painless as possible in part 1 and part 2. This post is pretty much the TL;DR of the series, as in the meantime I figured out the best way to run multiple instances of this image through Vagrant. So here's what I've been using for the past half year together with a few Ansible playbooks to perform some basic but very necessary tasks.
The Lab
The Vagrantfile provided brings up 3 NXOSv machines with the connectivity you see above: each nxethXYZ adapter is a separate network inside of VirtualBox.
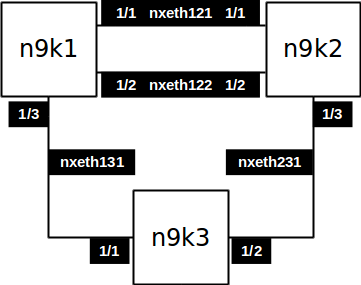
Each switch also gets a unique base MAC address and its SSH and HTTPS ports exposed using unique ports on the host machine (check the Vagrantfile).
The Setup
These are the steps from the very beginning to download and brings this lab up.
Get the image
First, download and install Vagrant and Ansible.
Then download the "Cisco Nexus 9000/3000 Virtual Switch for Vagrant" box from cisco.com. I've tested the process on these two versions: 7.0.3.I6.1 and 7.0.3.I7.2 (latest at time of writing).
Peruse the release notes over a hot cup of tea if you're wondering what's new.
Import it into the local Vagrant repository: vagrant box add --name n9000v-703I72 nxosv-final.7.0.3.I7.2.box
Provision switches one by one
Here we're following the steps from the DevNet documentation on how to provision one of these boxes. I've summarized the steps below for quick reference, but read the article the first time you do this, it has very helpful screenshots. There's also the NXOSv Documentation which may be useful later on.
- Clone my repo
git clone https://github.com/cmsirbu/nx9kv(or download the zip file if you don't use git, which you should!) - it contains the Vagrantfile and some ansible goodies - Start each switch one at a time and perform the initial setup
- In subfolder
3of the cloned repo run:vagrant up n9k1 - In a second terminal open up the console once the VM is booting:
socat unix-connect:/tmp/test stdin(on Windows open a serial connection to\\.\pipe\COM1with Putty) - Initial config via console
- Abort Auto Provisioning and continue with normal setup ?(yes/no)[n]
y - Do you want to enforce secure password standard (yes/no) [y]:
n - Set admin password - e.g.
cisco - Would you like to enter the basic configuration dialog (yes/no):
no
- Abort Auto Provisioning and continue with normal setup ?(yes/no)[n]
- Log in using admin and paste the config below into the console terminal (make sure you press enter after for that last command to execute)
conf t
feature nxapi
interface mgmt 0
  ip address dhcp
  no shut
  exit
username vagrant password vagrant role network-admin
boot nxos bootflash:nxos.7.0.3.I7.2.bin
end
copy run start
copy start bootflash:clean_config.cfg
- In the first terminal,
ctrl-cthevagrant up n9k1command trying to ssh into device pointlessly (it can't) vagrant ssh n9k1- enter passwordvagrantconfigured above - if you get the switch prompt, exitvagrant halt n9k1- we're done, stop machine- Open VirtualBox, locate the VM (will be named something like
3_n9k1_manynumbers) and adjust RAM if necessary (4096 minimum!) - Rinse and repeat for each other machine defined in the Vagrantfile (
n9k2andn9k3in this case) from step3
Run Ansible
This step is entirely optional of course, as the switches are now up and running with a clean config (which you have saved in their flash if you ever need to reset the configuration).
By running ansible-playbook provision.yml you get the correct hostname set on all 3 switches, nxapi and lldp enabled. Basics.
> ansible-playbook provision.yml

PLAY [POST VAGRANT UP PROVISIONING] **************************************************************

TASK [configure hostname and domain-name] ********************************************************
changed: [n9k1]
changed: [n9k3]
changed: [n9k2]

TASK [ensure nxapi is enabled] *******************************************************************
ok: [n9k2]
ok: [n9k3]
ok: [n9k1]

TASK [ensure lldp is enabled] ********************************************************************
changed: [n9k1]
changed: [n9k3]
changed: [n9k2]

TASK [save config] *******************************************************************************
changed: [n9k1]
changed: [n9k2]
changed: [n9k3]

PLAY RECAP ***************************************************************************************
n9k1                       : ok=4    changed=3    unreachable=0    failed=0
n9k2                       : ok=4    changed=3    unreachable=0    failed=0
n9k3                       : ok=4    changed=3    unreachable=0    failed=0
We're done!
If everything went according to plan (which is the point of using Vagrant and pre-packaged, predictable and repeatable builds), congrats, you have 3 NXOSv switches connected together ready for all sorts of adventures. Enjoy!
And, as always, thanks for reading.